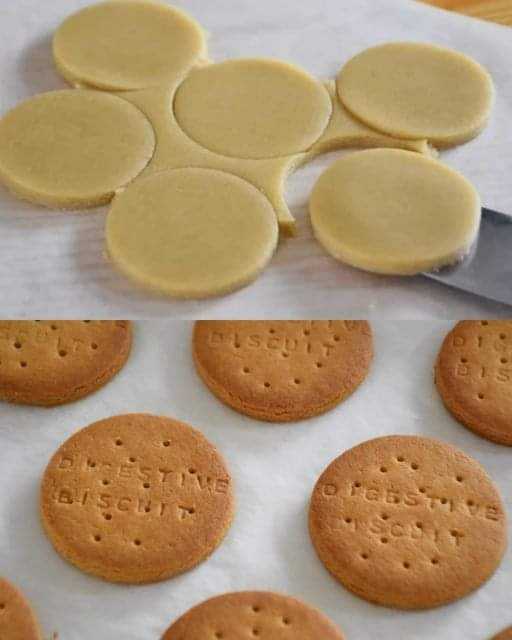
### Instructions for Making Homemade Digestive Biscuits
#### Step 1: Prepare the Dry Ingredients
1. Start by preheating your oven to **350°F (175°C)**. Line a baking sheet with parchment paper or a silicone baking mat to prevent the biscuits from sticking.
2. In a large mixing bowl, combine the **whole wheat flour**, **plain flour**, **brown sugar**, **baking soda**, and **salt**. Stir the dry ingredients together until they are well combined.
#### Step 2: Incorporate the Butter
1. Add the cold, cubed **butter** to the dry ingredients. Use your fingers or a pastry cutter to rub the butter into the flour mixture until it resembles coarse breadcrumbs. You should see small pea-sized pieces of butter throughout the mixture. This is important for getting that crumbly, light texture in your biscuits.
2. If you’re adding **rolled oats**, now is the time to mix them in. The oats add a subtle texture and a heartiness to the biscuits.
#### Step 3: Add the Wet Ingredients
1. Pour in the **milk** and **vanilla extract** (if using). Use a fork to bring the dough together, adding a little more milk if necessary. You want the dough to be firm but not too sticky. If the dough feels too dry, add a teaspoon of milk at a time until it holds together when pressed.
2. Once the dough comes together, shape it into a ball. Flatten the dough into a thick disk, wrap it in plastic wrap, and chill it in the refrigerator for about 15-20 minutes. Chilling the dough helps the biscuits hold their shape during baking.
#### Step 4: Roll Out the Dough
1. After chilling, remove the dough from the fridge and place it on a lightly floured surface. Roll the dough out to about **1/4 inch thick**. The thinner you roll it, the crisper the biscuits will be.
2. Using a cookie cutter or a glass (about 2 inches in diameter), cut out rounds from the dough. Gather any leftover dough, reroll it, and continue cutting out biscuits until all the dough is used.
#### Step 5: Bake the Biscuits
1. Place the cut dough rounds onto the prepared baking sheet, leaving a little space between each biscuit. You can lightly press each biscuit with the back of a fork for a traditional digestive biscuit look.
2. Bake the biscuits in the preheated oven for **12-15 minutes**, or until they are golden brown around the edges. Keep an eye on them towards the end, as they can burn quickly once they start browning.
3. Once baked, remove the biscuits from the oven and allow them to cool on the baking sheet for a few minutes before transferring them to a wire rack to cool completely.
#### Step 6: Serve and Enjoy
1. Your **Homemade Digestive Biscuits** are now ready to be enjoyed! Serve them with a hot cup of tea, or simply snack on them throughout the day. These biscuits are also perfect for dipping into coffee, or pairing with cheese, jams, or fruit for a more substantial snack.
### Tips for the Best Digestive Biscuits
1. **Chill the Dough**: Don’t skip the chilling step! Chilling the dough before rolling it out helps the biscuits hold their shape and prevents them from spreading too much while baking.
2. **Use Cold Butter**: Make sure your butter is cold when you rub it into the flour. This helps to create the signature crumbly texture of digestive biscuits.
3. **Customize the Flavor**: Feel free to add **spices** like cinnamon or nutmeg for a warm, aromatic twist. You could also add **chocolate chips** or **dried fruit** like raisins or cranberries to make these biscuits even more special.
4. **Storage**: These biscuits can be stored in an airtight container for up to a week. If you’d like to keep them fresh for longer, you can also freeze them for up to a month.
5. **Gluten-Free Version**: If you’re gluten-free, you can substitute the flours with a gluten-free flour blend, although the texture may vary slightly. You may also need to add a bit more liquid to compensate for the differences in flour consistency.
### Why Homemade Digestive Biscuits Are Worth the Effort
Making **Homemade Digestive Biscuits** at home gives you a fresher, more flavorful version of this classic treat. With just a handful of simple ingredients and a few easy steps, you can create a batch of biscuits that are far superior to anything you’ll find in a store. Whether you’re enjoying them as an everyday snack, a part of your afternoon tea, or even as a base for desserts like cheesecake crust, these biscuits are a must-try.
Best of all, you can control the ingredients, ensuring your digestive biscuits are made with the highest-quality, wholesome ingredients. So, why not skip the store-bought version and treat yourself to a homemade batch? Your taste buds will thank you!
