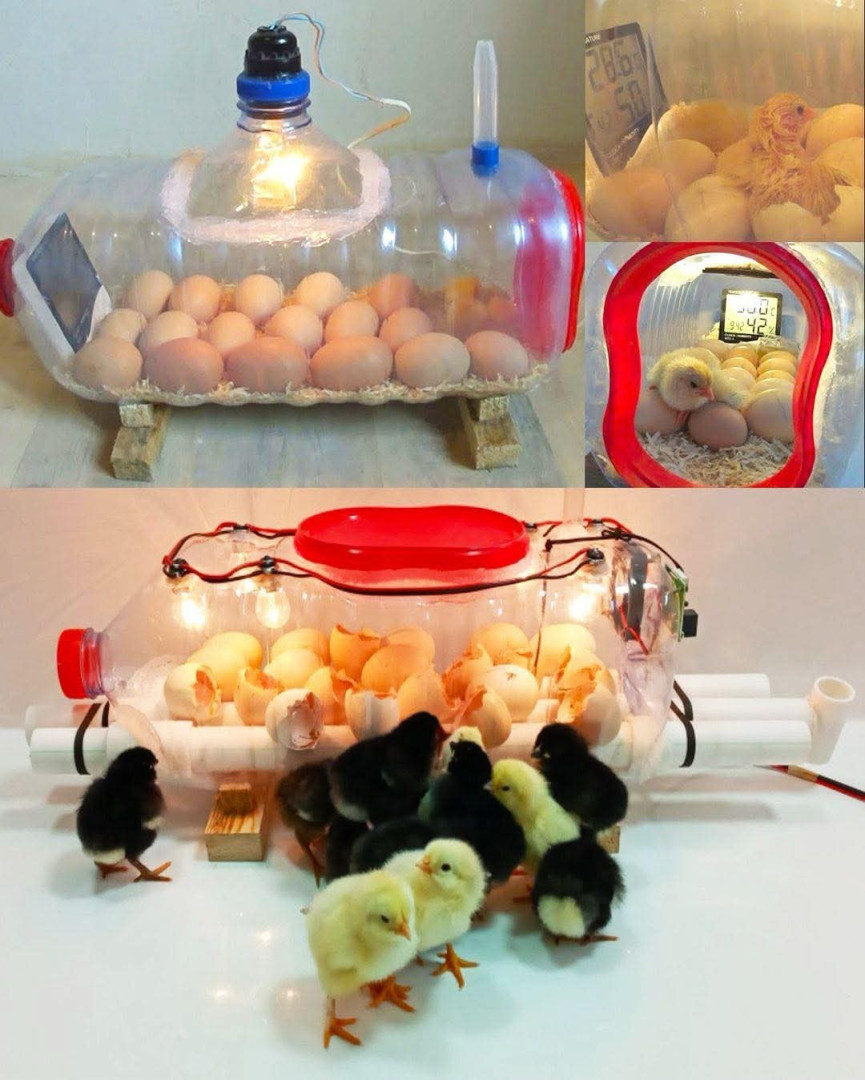
Sure! Here’s an informative and easy-to-follow article for your topic:
🥚 How to Build a Homemade Egg Incubator Using a Water Bottle — Simple, Low-Cost DIY Guide
Raising chicks from eggs doesn’t require expensive equipment — in fact, with a little creativity, you can build a homemade egg incubator using a water bottle and just a few basic materials!
Whether you’re doing a science project, trying backyard farming for the first time, or just love DIY hacks, this budget-friendly incubator can help you hatch eggs successfully at home.
Here’s everything you need to know to get started!
🧪 How Incubation Works (Quick Overview)
Before we dive into the build, it’s helpful to understand what an incubator does:
- Maintains a steady temperature (usually around 99.5°F or 37.5°C)
- Controls humidity
- Provides gentle ventilation
- Allows turning of the eggs (manually or automatically)
A homemade incubator won’t have all the bells and whistles, but it can work if you monitor it carefully.
🧰 What You’ll Need
- 1 large plastic water bottle (preferably 2-liter size)
- A small lamp or bulb (15–25 watts) or a heating pad
- Digital thermometer (a must for accuracy)
- Humidity gauge or hygrometer (optional but helpful)
- Small plastic container or sponge for humidity
- Scissors or utility knife
- Clear plastic wrap or ziplock bag (for a viewing window)
- Tape and aluminum foil
- Eggs to incubate (fertile, of course!)
🛠️ Step-by-Step: How to Build the Incubator
Step 1: Cut the Water Bottle
- Carefully cut a horizontal window on the side of the water bottle. This will give you access to place the egg and insert the heat source.
- Leave the top and bottom of the bottle intact to maintain shape.
Step 2: Create the Viewing Window (Optional)
- Cover the cut-out section with clear plastic wrap or part of a ziplock bag and tape it in place.
- This keeps heat in while allowing you to monitor the egg.
Step 3: Add the Heat Source
Option 1: Place a small bulb or lamp close to the bottle to gently warm the inside.
Option 2: Place a heating pad underneath the bottle for indirect warmth.
⚠️ Important: Always use a thermometer to ensure the inside stays around 99–100°F (37–38°C).
Step 4: Add Humidity
- Place a small container of water or a wet sponge inside the bottle to maintain proper humidity (aim for 50–60% during incubation and 65–70% during hatching).
Step 5: Place the Egg
- Gently set your fertile egg inside the bottle on a soft cloth or cotton pad.
- Ensure it’s not touching the heating element directly.
Step 6: Monitor & Turn Daily
- Turn the egg 3–5 times a day to mimic how a mother hen would rotate them.
- Monitor the temperature and humidity several times daily.
-
